Step 1
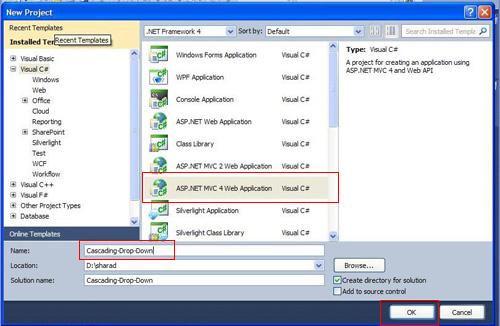
Go to File->New->Project
After clicking on project a new window will be open, in it select "ASP.NET MVC 4 Web Application" and rename solution name to "Cascading-Drop-Down" and click on ok button.
After click on "OK" button a new window will be open, in it Select "Basic" template and click on "Ok" Button.
Step 2
Now right click at solution explorer Click on "Manage NuGet Packages.."
Click on "Manage NuGet Packages.." After clicking on it a window will be open , type in search box "angularjs" and click on install to searched angular js item
After Installing angularjs click on close button
Step 3
At the Solution explorer in Script Floder , you may see angular js file has loaded. Now I edited "_Layout.cshtml" in "Views->Shared" folder.
|
<!DOCTYPE
html>
<html>
<head>
<meta
charset="utf-8"
/>
<meta
name="viewport"
content="width=device-width"
/>
<title>@ViewBag.Title</title>
@Styles.Render("~/Content/css")
@Scripts.Render("~/bundles/modernizr")
</head>
@* Here ng-app="MyApp" is used for
auto-bootstrap an AngularJS application. here ng-app="MyApp" means
<body> element is the owner
of AngularJS application*@
<body
ng-app="MyApp">
<div
style="height:1px;
clear:both;"></div>
@RenderBody()
@Scripts.Render("~/bundles/jquery")
@* Add Angular Library Here
*@
@Scripts.Render("~/bundles/angular")
@RenderSection("scripts",
required: false)
</body>
</html>
|
Step 4
Now I added a folder in Script folder name "AngularController" and after it a added a js file name ="CascadingDropDownController.js"
|
//here I am
separating each angular controller to separate file for make it
manageable
var
app = angular.module('MyApp', ['ngRoute']);
// Will use ['ng-Route']
when we will implement routing
//Create a
Controller
app.controller('CascadingDropDownController',
function ($scope, CascadingService) {
//inject CascadingService
$scope.isFormValid =
false;
$scope.StateID =
null;
$scope.StateList =
null;
$scope.CityID =
null;
$scope.CityList =
null;
$scope.CascadingList = {
StateID:
'',
CityID:''
};
//Check form Validation // here f1 is our form name
$scope.$watch('f1.$valid',
function (newValue) {
$scope.isFormValid =
newValue;
});
$scope.getStatesCity =
function () {
var
stateId = $scope.CascadingList.StateID;
if
(stateId) {
CascadingService.GetCity(stateId).then(function
(d) {
$scope.CityList =
d.data; // Success
},
function () {
alert('Failed');
// Failed
});
}
else {
$scope.CityList =
null;
}
}
CascadingService.GetState().then(function
(d) {
$scope.StateList = d.data;
// Success
},
function () {
alert('Failed');
// Failed
});
//Clear Form (reset)
function ClearForm() {
$scope.CascadingList = {};
$scope.f1.$setPristine();
//here f1 our form name
$scope.submitted =
false;
}
})
.factory('CascadingService',
function ($http, $q) {
// here I have created a factory which is
a populer way to create and configure services
var
fac = {};
fac.GetState =
function () {
return $http.get('/Home/GetState');
}
fac.GetCity =
function (index) {
return $http.post('/Home/GetCity?indexs='
+ index);
}
return
fac;
});
|
Step 5
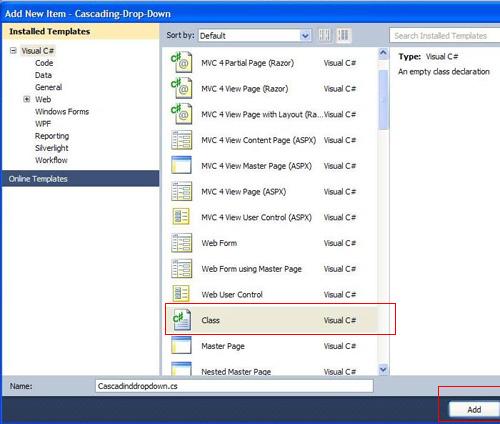
Now at the Solution explorer, right click on "Model" folder and ADD->Class
write the name of class "Cascadinddropdown.cs"
code of "Cascadinddropdown.cs"
|
using
System;
using
System.Collections.Generic;
using
System.Linq;
using
System.Web;
namespace
Cascading_Drop_Down.Models
{
public
class
Cascadinddropdown
{
public int StateID {
get; set;
}
public string StateName {
get; set;
}
public int CityID {
get; set;
}
public string CityName {
get; set;
}
}
}
|
Step 6
Now I added a controller at Solution explorer in "Controllers"
After Clicking on controller a new window will be open and rename controller name to "HomeController" and click on Add button.
HomeController.cs
|
using
System.Collections.Generic;
using
System.Web.Mvc;
using
Cascading_Drop_Down.Models;
using
System.Data.SqlClient;
using
System.Configuration;
namespace
Cascading_Drop_Down.Controllers
{
public
class
HomeController : Controller
{
//
//
GET: /Home/
public ActionResult Index()
{
return View();
}
//Return StateName
public JsonResult GetState()
{
List<Cascadinddropdown>
States = new
List<Cascadinddropdown>();
SqlConnection conn =
new
SqlConnection(ConfigurationManager.ConnectionStrings["mycon"].ConnectionString);
conn.Open();
SqlDataReader myreader =
null;
SqlCommand mycommand =
new
SqlCommand("select StateID,StateName
from State", conn);
myreader =
mycommand.ExecuteReader();
while (myreader.Read())
{
States.Add(new
Cascadinddropdown() { StateName =
myreader["StateName"].ToString(),
StateID = int.Parse(myreader["StateID"].ToString())
});
}
conn.Close();
return new
JsonResult { Data = States,
JsonRequestBehavior = JsonRequestBehavior.AllowGet
};
}
[HttpPost]
public JsonResult GetCity(int
indexs)
{
List<Cascadinddropdown>
Cities = new
List<Cascadinddropdown>();
SqlConnection conn =
new
SqlConnection(ConfigurationManager.ConnectionStrings["mycon"].ConnectionString);
conn.Open();
SqlDataReader myreader =
null;
SqlCommand mycommand =
new
SqlCommand("select CityID,CityName
from TCity where StateId=" + indexs +
"", conn);
myreader =
mycommand.ExecuteReader();
while (myreader.Read())
{
Cities.Add(new
Cascadinddropdown() { CityName =
myreader["CityName"].ToString(),
CityID = int.Parse(myreader["CityID"].ToString())
});
}
conn.Close();
return new
JsonResult { Data = Cities,
JsonRequestBehavior = JsonRequestBehavior.AllowGet
};
}
}
}
|
Step 7
Now Right Click on Index Action result and add a view "Index.cshtml"
|
@{
ViewBag.Title =
"Index";
}
<h2>Cascading
Dropdown List in Angular Js MVC </h2>
<div
ng-controller="CascadingDropDownController">
<table>
<tr>
<td>State</td>
<td>
<select
ng-model="CascadingList.StateID"
ng-options="I.StateID
as I.StateName for I in StateList" ng-change="getStatesCity()"
>
<option
value="">Select
State</option>
</select>
</td>
</tr>
<tr>
<td>City</td>
<td><select
data-ng-model="CityID"
" data-ng-options="s.CityID
as s.CityName for s in CityList">
<option
value="">Select
City</option>
</select></td>
</tr>
</table>
</div>
@section
scripts{
<script
src="../../Scripts/AngularController/CascadingDropDownController.js"></script>
}
|
Database script
|
SET
ANSI_NULLS
ON
GO
SET
QUOTED_IDENTIFIER
ON
GO
SET
ANSI_PADDING
ON
GO
CREATE
TABLE [dbo].[State](
[StateID] [int]
IDENTITY(1,1)
NOT NULL,
[StateName]
[varchar](50)
COLLATE SQL_Latin1_General_CP1_CI_AS
NOT NULL,
[active] [bit]
NULL,
[Latitude] [varchar](35)
COLLATE SQL_Latin1_General_CP1_CI_AS
NULL,
[Longitude]
[varchar](35)
COLLATE SQL_Latin1_General_CP1_CI_AS
NULL,
CONSTRAINT
[PK_StateMaster] PRIMARY
KEY CLUSTERED
(
[StateID]
ASC
)WITH
(PAD_INDEX
= OFF,
STATISTICS_NORECOMPUTE
= OFF,
IGNORE_DUP_KEY
= OFF,
ALLOW_ROW_LOCKS
= ON,
ALLOW_PAGE_LOCKS
= ON)
ON [PRIMARY]
)
ON [PRIMARY]
GO
SET
ANSI_PADDING
OFF
GO
SET
IDENTITY_INSERT [dbo].[State]
ON
INSERT
[dbo].[State]
([StateID],
[StateName], [active],
[Latitude], [Longitude])
VALUES (3,
N'Andaman and Nicobar',
1, N'6deg. and
14deg.N',
N'92deg. and 94deg. E')
INSERT
[dbo].[State]
([StateID],
[StateName], [active],
[Latitude], [Longitude])
VALUES (4,
N'Andhra Pradesh',
1, N'12deg.41min
and 22Deg. N',
N'77deg.and 84deg.40min E')
INSERT
[dbo].[State]
([StateID],
[StateName], [active],
[Latitude], [Longitude])
VALUES (5,
N'Assam',
1, N'24deg.
3min and 27deg. 58min N',
N'89deg.5min and 96deg. 1min E')
SET
IDENTITY_INSERT [dbo].[State]
OFF
SET
ANSI_NULLS
ON
GO
SET
QUOTED_IDENTIFIER
ON
GO
SET
ANSI_PADDING
ON
GO
CREATE
TABLE [dbo].[TCity](
[CityID] [int]
IDENTITY(1,1)
NOT NULL,
[CityName] [varchar](100)
COLLATE SQL_Latin1_General_CP1_CI_AS
NOT NULL,
[StateId] [int]
NOT NULL,
CONSTRAINT
[PK__TCity__F2D21A962E1BDC42] PRIMARY
KEY CLUSTERED
(
[CityID]
ASC
)WITH
(PAD_INDEX
= OFF,
STATISTICS_NORECOMPUTE
= OFF,
IGNORE_DUP_KEY
= OFF,
ALLOW_ROW_LOCKS
= ON,
ALLOW_PAGE_LOCKS
= ON)
ON [PRIMARY]
)
ON [PRIMARY]
GO
SET
ANSI_PADDING
OFF
GO
SET
IDENTITY_INSERT [dbo].[TCity]
ON
INSERT
[dbo].[TCity]
([CityID],
[CityName], [StateId])
VALUES (2,
N'ANDAMAN ISLAND',
3)
INSERT
[dbo].[TCity]
([CityID],
[CityName], [StateId])
VALUES (3,
N'NICOBAR ISLAND',
3)
SET
IDENTITY_INSERT [dbo].[TCity]
OFF
ALTER
TABLE [dbo].[TCity]
WITH CHECK
ADD CONSTRAINT
[fk_StateId] FOREIGN
KEY([StateId])
REFERENCES
[dbo].[State]
([StateID])
GO
ALTER
TABLE [dbo].[TCity]
CHECK
CONSTRAINT [fk_StateId]
GO
|
Now Some changes made in "App_Start"
folder files
"BundleConfig.cs"
"BundleConfig.cs"
|
using
System.Web;
using
System.Web.Optimization;
namespace
CascadingDropDownMVC
{
public
class BundleConfig
{
// For more information on
Bundling, visit http://go.microsoft.com/fwlink/?LinkId=254725
public
static void
RegisterBundles(BundleCollection
bundles)
{
bundles.Add(new ScriptBundle("~/bundles/jquery").Include(
"~/Scripts/jquery-{version}.js"));
bundles.Add(new ScriptBundle("~/bundles/jqueryui").Include(
"~/Scripts/jquery-ui-{version}.js"));
bundles.Add(new ScriptBundle("~/bundles/jqueryval").Include(
"~/Scripts/jquery.unobtrusive*",
"~/Scripts/jquery.validate*"));
// Use the development version
of Modernizr to develop with and learn from. Then, when you're
// ready for production, use
the build tool at http://modernizr.com to pick only the tests you
need.
bundles.Add(new ScriptBundle("~/bundles/modernizr").Include(
"~/Scripts/modernizr-*"));
bundles.Add(new StyleBundle("~/Content/css").Include("~/Content/site.css"));
bundles.Add(new StyleBundle("~/Content/themes/base/css").Include(
"~/Content/themes/base/jquery.ui.core.css",
"~/Content/themes/base/jquery.ui.resizable.css",
"~/Content/themes/base/jquery.ui.selectable.css",
"~/Content/themes/base/jquery.ui.accordion.css",
"~/Content/themes/base/jquery.ui.autocomplete.css",
"~/Content/themes/base/jquery.ui.button.css",
"~/Content/themes/base/jquery.ui.dialog.css",
"~/Content/themes/base/jquery.ui.slider.css",
"~/Content/themes/base/jquery.ui.tabs.css",
"~/Content/themes/base/jquery.ui.datepicker.css",
"~/Content/themes/base/jquery.ui.progressbar.css",
"~/Content/themes/base/jquery.ui.theme.css"));
}
}
}
|
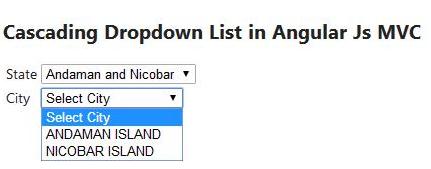
Now Run your application and output is


